Battle Report 22.1.2022 - Rise of the Necromancer LL VS Isengard
Today I met again with my old university friend to play some MESBG in the game area of SirenGames Vienna.


One of these matches was my Dol Guldur army versus his Isengard force.
Setup
I played again my Rise of the Necromancer legendary legion - if you remember last time I already used it against my friends Return of the King LL but we used simplified rules and I was easily beaten. This time we played by all available rules and with a higher point limit.
Our point limit was roughly 800 points and we played scenario 9 from the rule book (Conquest & Control? Sorry I have it only in German and am not sure how its named in English).
This was my list - Rise of the Necormancer LL
The Necromancer of Dol Guldur (Army Leader)
Nazgul of Dol Guldur:
-The Witch King of Angmar
-The Dark Headsman
-The Lingering Shadow
-The Forsaken
-The Abyssal Knight x 2
-The Slayer of Men
Castellan of Dol Guldur
Isengard (more rough listing since we did not use printed out army lists, so just what I remember + what I see on the photos ;) ):
Saruman (Army Leader)
-Feral Uruk-Hai x 2
-Uruk-Hai Banner
-Uruk-Hai with Sword and Shields x 5
-Uruk-Hai with Pike x 9
Isengard Troll with Spear and Shield
Vrasku
-Uruk-Hai Crossbows x 6
Mauhur
Uruk-Hai Scout with Shield x 6
Uruk-Hai Scout with Uruk Bow x 6
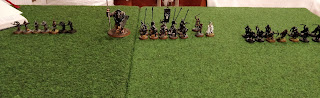
We placed the five markers and the terrain. I rolled a 4 so I was able to choose my deployment more freely. I deployed as one warband near the marker of my battlefield side. My friend rolled a 1 and had to deploy within 12" of the center of his side. We were ready to start.
The Battle
I won the first priority. Since all Uruk crossbows where in immediate reach, I cast Shroud of Shadows onto the Necromancer, killed one crossbow with Chill Sould and moved into the right corner of my side. I sent the Lingering Shadow (LS) on the way to the crossbows and the Slayer of Men (SoM) and the one Abyssal Knight (AK) to block the Uruk scouts under the command of Mauhur. The Castellan and the WitchKing (WK) moved to the left side of the central building to attack the Feral Uruks and Saruman. The other AK, the Dark Headsman (DH) and the Forsaken (FK) moved to the right target marker.
My friend moved Mauhur and his scouts into the woods on my left, while the ones with bows stayed in the center and only moved closer to shoot afterwards. The pike block and the troll moved to my right side into the plaza between the buildings.
In the next few turns, Vrasku shoot the WK dead, only for him to reappear and corner Saruman. He used Flameburst to kill him and flee, the WK in pursue.. The LS reached the crossbows and started to decimate them slowly, always blocking at least two of them. The SoM did the same with the Uruk scout bowmen. Having forgotten about the increased speed and woodland creatue attributes of the scouts under Mauhur, I had to rush my first AK back to support the Necromancer. He nonetheless was catched but his Terror protected him from ever having to fight more than two enemies. Already the first combat saw the death of Mauhur ;)
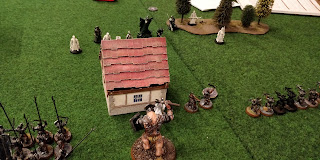
The Castellan engaged the Feral Uruks and well... basically stayed there for the rest of the game and blocked off everything =D
AK 2, DH and FK successfully managed to tie up the pike block while, due to bad placement on my friends side, the troll could do nothing but watch.
Basically for the rest of the game, the LS fought the crossbows, the SoM the scout bowmen and the AK 1 the rest of the scouts.
Despite me hunting him and he and the Necromancer exchanging magical barrages, I was not able to inflict a wound onto Saruman. The weasel always managed to slip away^^
The WK alternated between hunting Saruman and fighting the troll.
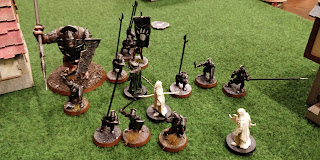
My Nazgul on the right, cracked open the pike block and managed to divide most of them. Some were able to slip through and attack the Necormancer. But again he was never in real danger.
The battle raged back and for like that. My Nazgul always jumping around the battle field and attacking vulnerable positions and units like the enemy banner bearer.
When the battle had been going on already for ~2h 10m, we decided to play only for another 20 minutes since the shop would close soon. I was able to kill and block more Uruk-Hai but the still persisting numerical advantage allowed my friend to take three of the five target markers while I could only secure one.
In the end nobody was broken and no wounds had been dealt to the army leaders. So I lost with 6 to 2 points.
I was able to kill 19 Uruks (22 would have been required to break Isengard). My only lost model was the Castellan. The Necromancer ended the game with 8 will left.


Lessons learned
The Dark Lord must survive
The Necromancer is the center piece of this LL, which holds everything together. About around half of the game, my friend realized that and tried to get everything he had to him and maw him down. However not only did my Nazgul block nearly everything (more on that later) but what got through, never proved to be a danger. Mauhur and some warriors reached the Necromancer and engaged him in close combat. Although they were never able to do that in great numbers thanks to Ancient Evil and Terror (also on that, more later on). Thanks to the improvement of the Necromancer through the LL (he gets two attacks instead of just one) and his high defense, he was more than able to hold himself and even kill everything that touched him - F 7 and D 8 are nothing to sneeze at ;) And I think this is exactly how it should be: Don't get overconfident and stay behind but do not be afraid of dealing with attackers^^
Shooting
Isengard brought a lot of shooting to the table. Deploying so close by each other, the Crossbows never had to move to get into reach and therefore could shoot from the first turn on. The same circumstance helped the Scouts with Uruk bows - after one movement they were in reach. So I prepared to face a lot of arrows and get into trouble. However... it never happened.
On Turn 1 I used "Shroud of Shadows" to protect the Necromancer and move back. From turn 2 on, always at least half of the shooters were blocked by or in combat with the Lingering Shadow and the Slayer of Men. And even when they were able to target a Nazgul or the Necromancer, the thick armor of defense 6 and 8 scarcely allowed them to wound. And even if, the Necromancer always had enough will and the Nazgul came back the next turn. So shooting really did not bother me at all.
One to tank them all
I had heard stories but I did not believe them until I saw it myself. Castellans of Dol Guldur really are walking tanks! My single Castellan got shot at but cast of everything the Uruk-Hai threw at him. And after two turns, till the forelast turn of the game, he tied up everything that tried to get past the left side of the house in the center. The Feral Uruks, Saruman, Vrasku, ... nothing got past him. The only reason he became my sole lost model, was because finally he used up all his will. Quite a surprise and I will not hesitate to use them in the future =)
Board control - Teleport and terror will keep them in place
This LL will nearly always be outnumbered by far on the battlefield. Also your army leader is required to keep things together and will probably be the number one target of your enemy. So how do you avoid getting overwhelmed when for each of your models, the enemy has five or more?
The key is board control. And thankfully all your models have the right tools for it.
All models in this LL (except for the Keeper of the Dungeons, which I will ignore since I think he does not really fit in) have Terror, the Nazgul have Harbinger of Evil and the Necromancer has Ancient Evil. So basically everyone (with some exceptions) who wants to attack you, must pass a courage test and will have to do that with reduced courage. This prevents you from getting swarmed by too many enemies at once. The few models who actually get into combat with you are than easily killed or at least blocked for another round.
The other important key for keeping board control is part of the Unholy Resurrection rule. After coming back on the board (when being killed in the turn before), a Nazgul may be placed anywhere within 6" of the marker of his death (only base contact with an enemy model is not allowed). This is a very big thing! It means you could reach enemy models in the back of the front like casters, banner bearers etc. Or you blocked a group of enemies and now you can suddenly teleport somewhere else and maybe join another Nazgul or protect the Necromancer, get behind a building etc. This gives you the much needed mobility you would normally lack and also allows you keep your enemies in check where you want it.
You cannot kill what is already dead
If the Necromancer is the center piece model of this LL, than the Unholy Resurrection is the most important rule. The Necromancer improves the requirement for resurrection rolls from 3+ to 2+. A 2+! This means anything but a 1 will bring back a DG Nazgul. And even than every Nazgul has at least two Might which can be used to modify this roll. So you can avoid two bad rolls. You really should not waste your Might for anything else and only save it for these occasions!
It is pure joy to tie up and block the enemy models, to die and come back and slowly but steadily kill them one by one. Since we are already talking about it...
War of attrition
Nazgul of Dol Guldur have good profiles. But if you take a closer look, you will realize that they are much better at staying in the game than at killing things. Only two attacks and S 4 make them good enough against most warriors. But dealing with better than midtier heroes and masses of warriors will overwhelm them quite easy. So why is that not a problem at all?
First of, despite the Nazguls clearly being combat oriented, you should not expect them to go in and kill masses of enemies like e.g. Aragorn, Elendil or other similar heroes. This is the wrong mindset and will only disappoint you.
Using the Nazgul in this LL really means you are fighting a war of attrition. Try to block as many models as possible and your Terror and Harbinger of Evil will ensure that you will never face too many opponents at once. Do this and you will see that slowly but surely an enemy model will die here, another one there. And the longer the game goes on, the more kills you will accumulate and wear down your opponents army. Be patient, pick your fights and enjoy how your adversary slowly realizes that with each killed Nazgul, he only prolongs his inevitably defeat at the hands of your undead servants =D
Fun - on both sides?
This match was probably the most entertaining I had so far in MESBG! =D The idea and the models of an all-hero Dol Guldur army intrigued me from the first moment I heard about it. I had high expectations from this LL and I was not disappointed. Playing them is definitely a completely different experience than with other armies whether they are standard or all-hero (from my humble point of view after playing MESBG for one year^^). It is even more tactical and requires good board control and patience.
Is it fun to play against it? Well so far I can only tell you about the experience of my friend. He said that in general he enjoyed playing the match. But it did feel frustrating that my Nazgul seldomly died (I guess over the course of 2.5 hours, a total of ~10 Nazgul deaths happened) and even when he succeeded, they came back in the next turn.
I think part of the experience stems also from how you play against them. If you try to kill them off and end the game by breaking them, you will have a hard time. You should probably try to kill of the Necromancer and/or concentrate on the objectives of the scenario. In our case, he could have occupied the center target markers and use the speed of the Uruk Scouts to catch up to the Necromancer. This way I would have been forced to charge into a mass of warriors while also protecting my leader.
But only future matches will tell ;)
So is this LL overpowered?
Now after having read my post till here, you may ask yourself if this LL is overpowered? In my opinion, no. I had a blast playing it and concentrated on the experience rather than the scenario goals but nonetheless I actually lost points wise. Things might have been different if both players had really played for the scenario. But I think like with most armies, there are scenarios where they fit in better and others where they have a disadvantage.
Besides that there are at least four opponents where this LL probably has a lot of problems:
- Elve armies: Elven-made weapons negatively affect the resurrection roll and decrease it by one - so you need +3 when a Nazgul gets killed by one. Also elves feature a lot of strong heroes which outmatch the Nazgul easily. Additionally elves have in general high courage and fight value.
- Cavalry only or heavy armies: If this LL lacks something than it is speed. Nothing moves more than 6" (except the Lingering Shadow) per turn, so cavalry will easily outmaneuver everything. Also getting charged by mounted models is a danger for everyone although Terror and the courage debuff help here a little bit.
- High Courage: Everything with high courage will be more successful at charging the LL models. And the more models can attack a single Nazgul, the easier they will die and lose their advantage from doing smaller close combats.
- Magic heavy armies: Magical attacks too decrease the resurrection roll by one. So armies with potent magic user or focused on magic will be able to deal better with this LL. Especially the Vanquishers of the Necromancer come to my mind. Yes the magic resistance helps but very strong magic, high fight values, high courage and elven-made weapons are a quite dangerous combination.
Conclusion
This was my first battle at a points level of 800. I gave the Uruks a battle the Dark Lord would be proud of! It was a lot of fun playing this LL. Although point wise I lost, it definitely did not feel like it ;) Looking forward to use it at a tournament and future games and seeing my opponents faces when my Nazgul keep coming back ;P
The Castellan keeps his watch and happy hobbying until the next time =)


I have faced 6-8 Castellans over the past few months and they are a SLOG for most heroes to kill. By the time you deal with them, their resources are usually depleted and the rest of your army has moved on. They are sneaky and survive in a very different way than Nazgul of Dol Guldur.
ReplyDeleteI am curious how the Dark Headsman was - great model, kind of meh special rule.
Wow i can Imagine the slog xD
DeleteYeah the DH really is just a standard DG Nazgul with the small chance of dealing more than one wound... Never happened in this Match.
SoM, LS and Forsaken were the most interesting ones to play although only SoM and Forsaken actually Bring something into Combat to have benefits